The following steps are in a checklist format and the intent is to go through them in order, except where stated otherwise (in some cases ORDER MATTERS). We have provided links to documentation with each step and videos to help you along the way.
Before Getting Started:
- If you haven't watched our Basic Orientation video, we recommend this to familiarize you with the ClassReach website and some basic terminology.
Adding Additional Admins
- If you plan to add any additional admins who will also be Guardians, we recommend that admin users be the one to fill out the application. If they are logged in to ClassReach when they start the application it will know who they are.
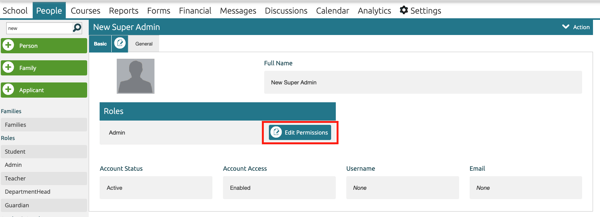
- To add an admin you will need to create their account manually and give the role of Admin. Next, decide if you want them to be a Super Admin (permissions that let them do everything you can) or a regular Admin (permissions are set with the Edit Permissions button seen below) . It will default them to a regular admin. Here are the steps:
- Follow the steps for Creating a Person.
- Click on the person's name on the People Page.
- Under Roles, click Edit Permissions button.
-
- Assign them Super Admin by selecting Yes at the top of the page OR leave them as a regular Admin by selecting No and then set the specific permissions for them on that page.
- Click Save.
Basic Set Up:
Most of the Basic Set up will be completed during Session 1 based on your responses to the welcome email questions. Here's a list of the last couple steps for you...
🔲 1. Set your School Information: Settings page > School Information
🔲 2. Set your Login Page Settings: Settings page > Login Page Settings
🔲 3. Input Billing Information: Settings page > Billing
🔲 4. Set up your payment processor integration. This will be either Stripe or Gravity.
a. Set up Stripe Payment Integration: Financial Page > Settings
b. Set up Gravity Payment Integration: instructions should have been emailed to you
Training Session 1
The first training session will cover School Settings, Forms and People. As part of that, we will discuss customization of the Application.
People
There are three ways to add People to ClassReach:
- People page - the Admin enters one user/family at a time
- Application - the family enters their own information
- Import - the Admin uses a spreadsheet of names and information
The video below is a quick overview of the initial people set up.
🔲 5. The ClassReach Application is ready to go, out of the box. You have the option to customize it using the Form's Editor via Settings > Application.
🔲 6. Manually Create a Person and Create a Family: People Page > +Person/+Family
🔲 7. Import Users: Settings Page > Imports
Training Session 2
The second session will cover Courses and Financials
Courses
You can manually enter courses or import courses into ClassReach. This video goes over the initial course set up requirements and options and walks you through an example of setting up a course and section.
Course numbers are required and can be nearly anything you want. Here's an example of a college-type numbering scheme, but it can certainly be much simpler than this.
This example uses a 6-digit number for courses.
- The first two digits are the Academic Level
- The second two digits are the Department
- The third two digits are used to number courses in that Academic Level/Dept
For example:
- American History is 110300 (11th Grade, 03 is the History Dept, 00 is this course)
- Physics is 120400 and 120401 (12th grade, 04 is Science, 00 and 01 are Regular and Honors)
🔲 8. Set your Departments: Settings Page > Departments
🔲 9. Set up Gradebook Settings: Settings Page > Gradebook Settings
- This is just the creation of the different settings and not the details
- Details will be set up during Classroom Settings
🔲 10. Set up a plan to assign Course numbers and abbreviations.
🔲 11. Import Courses: Settings Page > Imports
🔲 12. Create a Section(s) for each Course: Courses Page > select a course > +Section
Financials
🔲 13. Complete Basic Financial Set up: Financial Page > Settings on the left side bar
Follow the steps in above video to set up your Accounts and Categories
🔲 14. Enroll Financial Customers: Financial Page > Summary Section
NOTE: This is not required for families that pay an application fee or enrollment fee right off the bat as they will be auto-enrolled. This would be for any families that have active students and have not paid via a form already.
Training Session 3
The third session covers Learning Management (Classroom set up) and School Management.
Classroom Set Up
🔲 15. Set up Classroom Room Numbers: Settings Page > Classrooms (OPTIONAL)
🔲 16. Finalize Gradebook Settings
🔲 17. Attendance Markings: Settings Page > Attendance Markings
🔲 18. Conduct Items: Settings Page > Conduct Items
🔲 19. GPA Calculation: Settings Page > GPA Calculation
School Management - Communications, etc
Lastly, consider these settings prior to completing your initial set up of ClassReach
🔲 21. Announcements: School Page > +Announcements
🔲 22. Documents: School Page > +Document
🔲 23. Calendar: Calendar Page > +New Event
Need Help or Have Questions?
Please contact support if you have any questions by clicking
![]()
at the top of your ClassReach page. That will open the ClassReach Support Tools. From here, click "Support Tickets" to fill out a short form that will be sent to support. This is the best way to reach us.
