Financial Agreement - Discount Rules
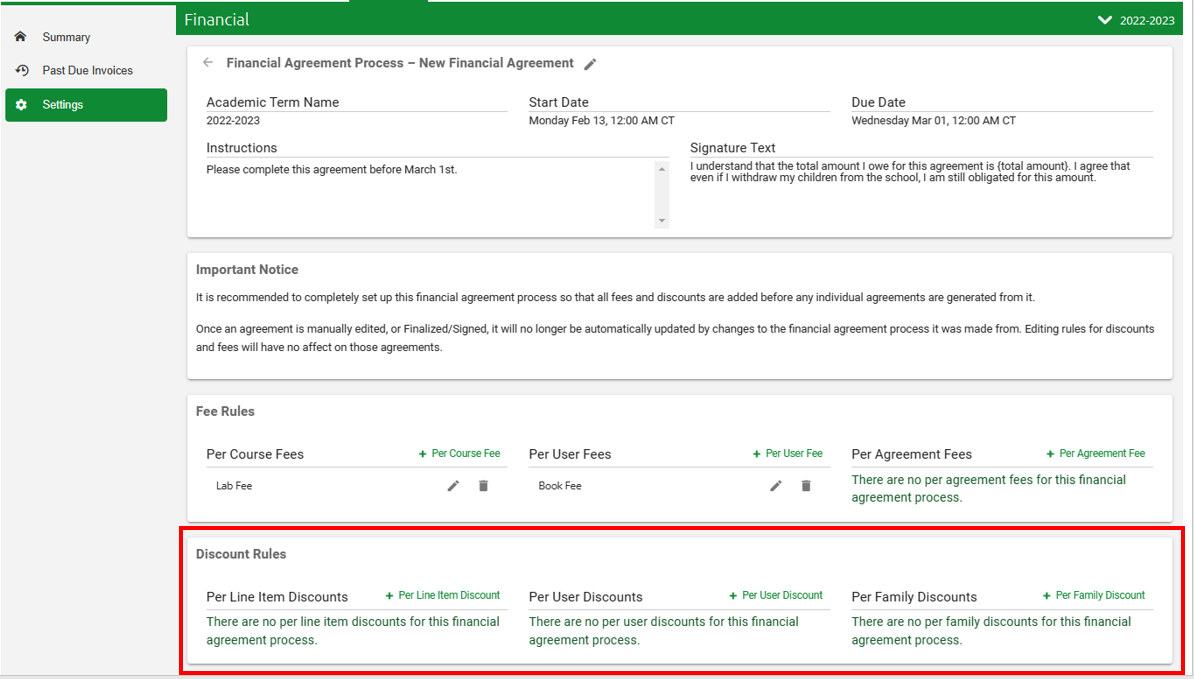
Discount Rules will determine the amount removed from a financial agreement. The rules are broken down into three different types based how they behave: Per Line Item Discounts, Per User Discounts and Per Family Discounts.
Important Note: To access your school's Financial Suite, you must be either be designated a Super Admin or have been granted “View and Edit” permissions for Financial Permissions. If neither of these apply to you, you must contact someone in your school with Super Admin privileges.
Financial Agreement Discount Rules are found in the Financial Settings Page, in the Financial Agreements:

Discount Rule Types
The type of discount rule will help determine how the discount behaves and when it is applied.
- Line Item Discounts: These will be subtracted from the agreement total based on the line items that qualify. They are associated with line items on an individual level.
- Per User Discounts: These are subtracted from the agreement total based on the users and if they qualify. These are associated with the individual users on the agreement, students and guardians.
- Per Family Discounts: These are subtracted from the agreement total based on if the family as a whole, qualifies for the discount. These are associated to the agreement as a whole, not individual users or courses.
Discount Rules Options
Each type of discount rule created will have the many of the same fields to fill out:
- Name: This is the internal name for this discount rule; your users will not see this description.
- Type of Discount and Value:
- Percentage Discount: This will calculate the amount removed based on the percentage you enter into the Value. So, instead of entering in $100 off, you may enter in 5 for 5% off.
- Cap: This is to set the largest about that can be charged for a fee. So, you may charge $100 per course, however, the maximum you charge for courses is $500. Then you could set the value at 500 and the system will remove any fees for courses above $500.
- Flat Amount: You can use this to set a flat discounts. So, you offer $40 off courses for military. Then you can use Flat Amount with a value of 40.
- Apply to Charges Exceeding: If you would like to only apply a discount to charges above a certain amount, you can enter that amount here. If you do not have this qualification, then you can leave this blank.
- Maximum Value of Discount: If you would like to put a maximum amount that can be taken off for this discount you can enter that here. So, if your $40 off military discount is up to $500 then you would enter in 500 here. However, if you do not have this qualification then you can leave this blank.
- Order Users By and Order Users From: This will tell the system what order to apply the discount in.
- If you would like it to apply this discount starting with the student in the highest grade and working towards the lowest. Then you would set it to Academic Level and High to Low.
- If you would like it to apply this discount starting with the lowest amount owed and working towards the highest. Then you would set if to Calculated Total and Low to High.
- LOGIC: If you set a rule for 50% off the registration fees for 3 or more students and you have different registration fees for different academic levels, then the amount discounted would change based on which students were considered the third, fourth, fifth, etc.
- Account Categories: Discounts are applied to categories, not specific fees. It is important that if you want to take of 50% for registration, that you have a Registration category associated with the fee and discount. Any other fees within that category may get this discount applied to them.
- Additional Filters
- Apply user range restriction to this discount: This is user to set discounts that may only apply to a certain number of students on the agreement.
- Example: If the registering 1 student is a $100 registration fee, a 2nd and 3rd student get 25% off, and any additional students get 50% off. Then you would create a rule for 25% off and set this to Min: 2 and Max 3. You’d then create another discount rule for 50% off and set this to Min: 4 and leave the Max blank.
- Apply time frame restriction to this Fee: You can set the dates in which this fee will apply. For example: some schools have amounts for early registration, registration, and late registration. You could use this to set the dates that this particular fee would be charged to. The date checked against is the date that the agreement is finalized.
- Apply User Filters to the Fee: This is a similar filter builder as the one you may have previously used in Reports. Use this to set which users on the agreement will be charged for. For example: All seniors are charged for their senior trip. You could use this to ensure this fee applies to Students with an academic level of 12th Grade. Then they will be the only ones with the fee added.
- Apply Family Filters to the Fee: Similar to the User Filter, this is for families. For example: New families are charged a New Family Capital Fee. You could set that any family with an Application : Date Created after a specific date is charged this fee.\
- Apply user range restriction to this discount: This is user to set discounts that may only apply to a certain number of students on the agreement.
Reorder Discounts
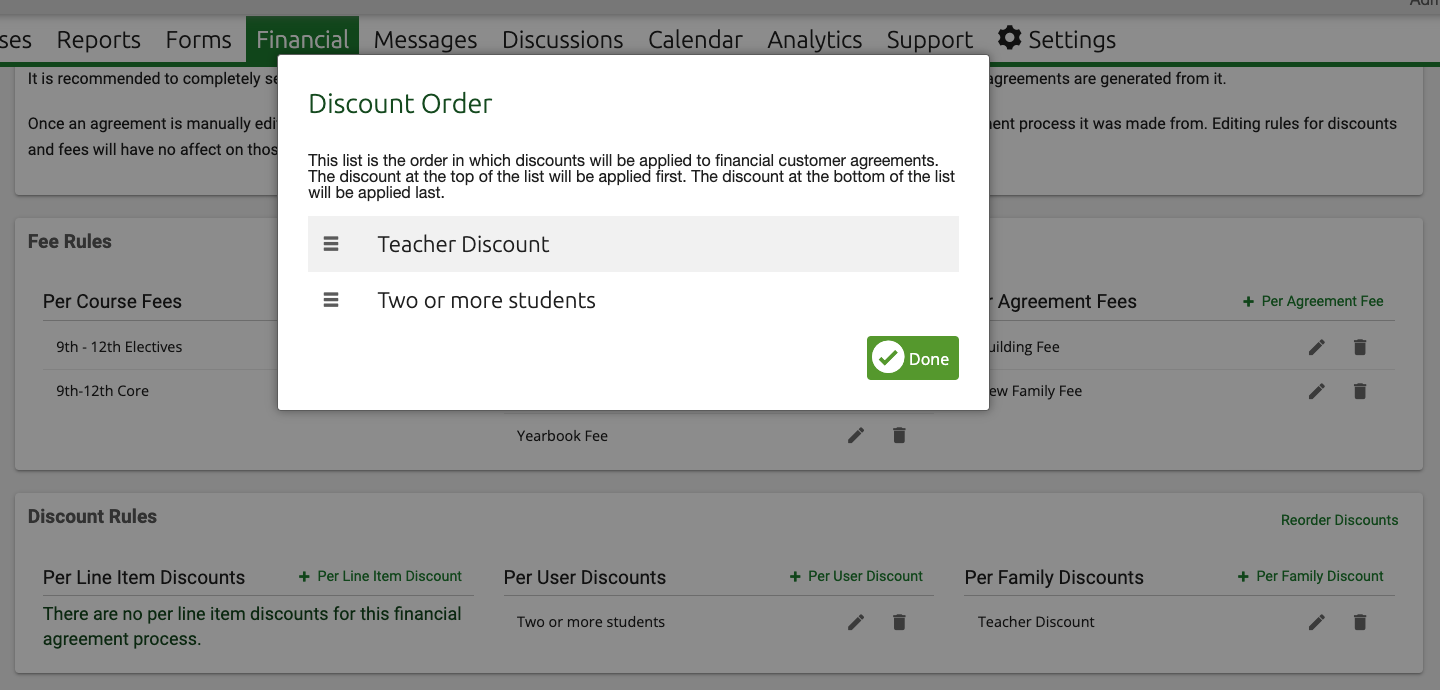
If you use multiple discounts in your Financial Agreement, the order that those discounts are applied can make a significant difference in how those discounts are calculated and then applied to the agreement. When you create an agreement for a family, review how the charges and discounts are applied before finalizing the agreement. If you need to change the order that the discounts are applied, click on "Reorder Discounts" in the upper right corner of the Discount Rules section.

You will see a pop-up of your discounts and from that you can rearrange the order by click/dragging the bars on the left side of each discount. Click the Green "Done" box when finished.

To test the changes, return to the particular family you are working on and select "Refresh." This will recalculate the charges and discounts. 