Adding Charges via Transaction Batches
Adding charges to your customer's accounts can be done in two ways. 1) By batch using the Transaction Batches on your Financial Summary page which this article will cover and 2) Individually by customer via the Financial Customer page .
Important Note: To access your school's Financial Suite, you must be either be designated a Super Admin or have been granted “View and Edit” permissions for Financial Permissions. If neither of these apply to you, you must contact someone in your school with Super Admin privileges.
One important aspect which applies to all pages of the financial suite is the School Year drop-down in the upper right of every page. Be sure to select the appropriate school year when viewing or editing any information on that page!
Using Transaction Batches to Add Customer Charges:
This feature is found on the Financial > Summary page in the Transaction Batches section. Click ADD BATCH in the upper right to begin the process:

Fill in the relevant fields:
- Name: The name as you would like it to appear
- Invoice Due Date: The date you would like the invoice to be due
- Create new invoice for all customers? If yes, charges from this batch will be posted a new invoice. If no, charges will be posted to existing invoices if possible.

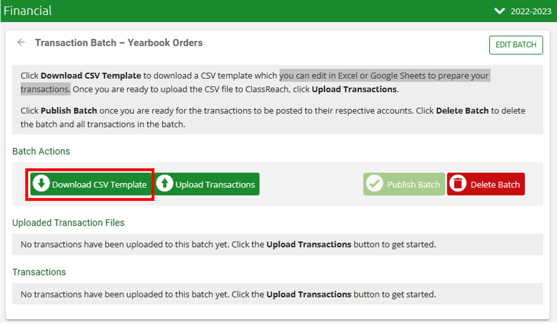
- Click the Download CSV Template button and fill out the next set of questions:

- Category - Required - select from this drop-down the Financial Account Category this batch of transactions is related to.
- Will the transactions be tied to specific students? - Required - This is meant to add the expense for a specific student. Below are two example csv downloads - 1) not tied to specific students 2) Tied to specific students
- CSV File Name - Required - this is the name of the file that will be downloaded to your computer.
- CSV Example- Not tied to specific students; there will be one row for every financial family in the specific financial year you are working in.

- CSV Example - Tied to specific students
Note the extra columns with the student's name and Academic Level; there will be one row for every student in the specific financial year you are working in.
- CSV Example- Not tied to specific students; there will be one row for every financial family in the specific financial year you are working in.
Adding Charges to the CSV Template File
Once downloaded, you can open the CSV Template with MS Excel, Google Sheets or any spreadsheet software to prepare your transactions. Add the numeric value of the amount you wish to charge to the Amount to Charge column. No currency symbol needed.
- The charge does not have to be the same for every row.
- Do not edit/modify any column other than to add the amount.
- Do not delete any of the columns - they are all needed to perform the upload
- If you don't want to charge a family/student, just leave the Amount to Charge blank. You can delete rows, but it's not necessary or recommended.
- You can sort by Academic Level in order to more easily charge all the student in one or selected Academic Levels.
When you have added all the charges to the CSV Template, click SAVE. Do not use SAVE AS or make a copy to another file of another type. It needs to remain as a CSV in order to upload it.
Upload the Transactions
To upload the CSV Template, you will return to the batch. If you've exited the batch, you can return to it from the Financial Summary page > Transaction Batches section by clicking on your batch's name.

Click the Upload Transactions button to select the CSV template and upload it to ClassReach Financials. There will be a pop up window for you to select the template file and Save.

The results will be shown for one last review; click on Publish Batch if you are satisfied and ready to post the charges or click Delete Batch of you need to make further changes.

Batches take a few minutes to run and then you will see the charge posted to each customer.
Below is an example charge from the above batch. The Description field will match the Batch Name.

Related Documentation:
Adding Charges to Individual Accounts
Financial Accounts and Categories