The Financial Accounts and Categories are found on the Financial> Settings page.
Note: Some schools choose to have a single account for all charges, while other schools use multiple accounts. Look below to the tips & tricks section if you need assistance deciding on the best choice for your school.
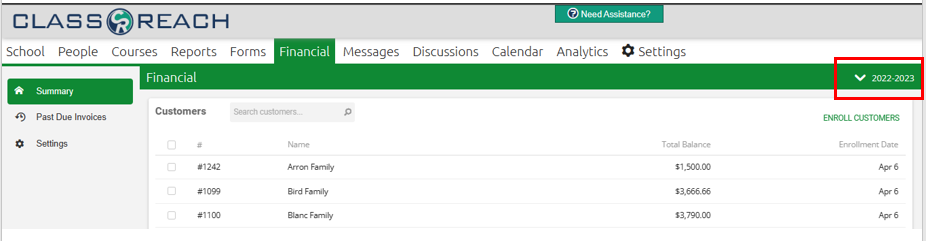
Remember to select the appropriate school year!
To Add a New Account:

-
- Click the green ADD ACCOUNT link within the Accounts box.
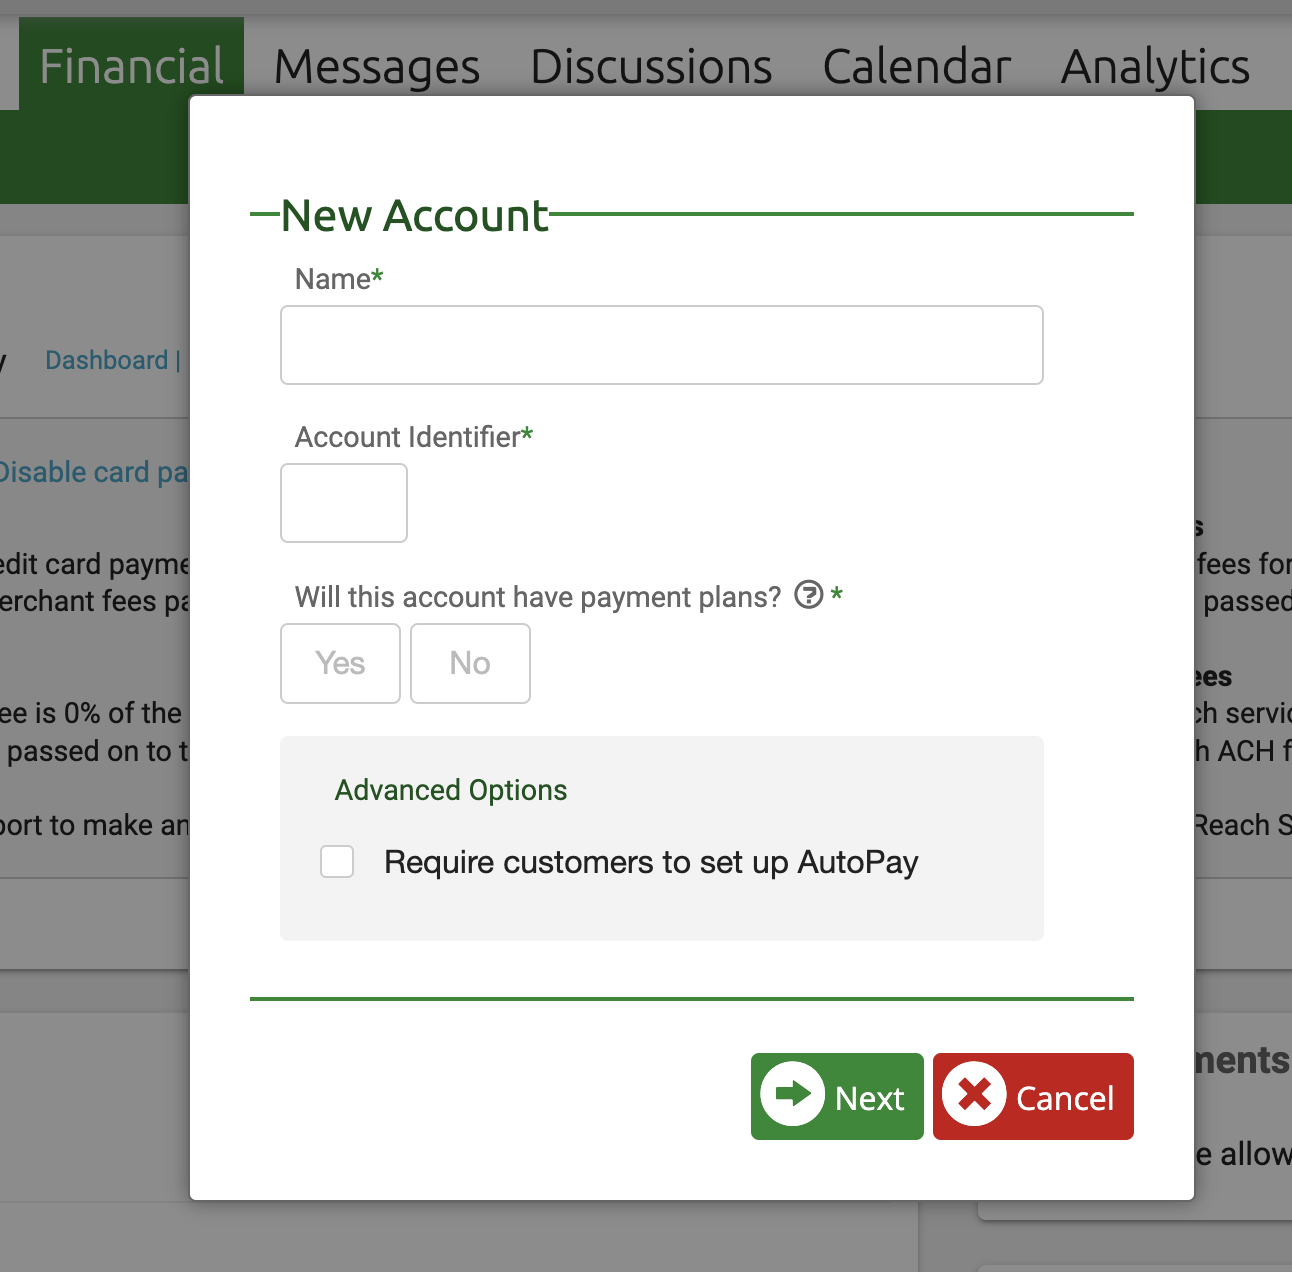
- You will be prompted to fill in some details about the account. These details can be edited in the future if needed.
-
- Fill out all fields in this screen:
- Name: Customers will see the name of the account (on invoice charges, etc.).
- Note: At this time CR does not support running reports by account or categories. Reports can be run using descriptions associated with each transaction.
- Account Identifier: This will be a short code for the account. The account identifier may be numerical, alphabetical, or a combination of both.
- Will this account have payment plans?
- Choose Yes or No
- If you choose No, customers will be automatically enrolled in the account. This type of account is for incidentals that will be invoiced with one specified due date.
- By choosing Yes, customers will prompted to enroll in the account and to choose a payment plan. Payment plans give the customer to pay over a longer period of time with multiple invoices (eg, monthly, quarterly, etc).
- Advanced Options
- Require enrolled customers to set up AutoPay
- Check this box if you want to require users to set up an Autopay using ACH Debits or Debit/Credit Cards.
- It is possible to turn off AutoPay for specific users even if this box is checked.
- Require customers to enroll in a payment plan prior to posting charges
- Customers will immediately prompted to enroll in a payment plan
- If this option is NOT selected, customers will not be prompted to enroll until charges are posted to the account
- Require enrolled customers to set up AutoPay
- Name: Customers will see the name of the account (on invoice charges, etc.).
- Fill out all fields in this screen:
Note: AutoPay feature requires your school has a Stripe or Gravity Integration.
-
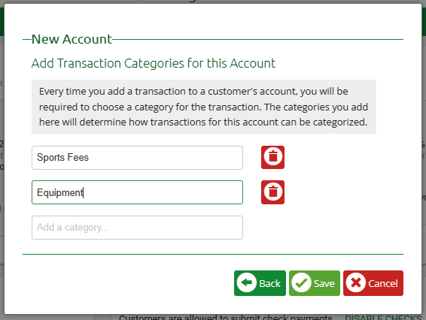
- Click the green Next button at the bottom of the window.
- Now you can add the Categories for this account.
-
-
- Note: You can add additional categories and edit the names of categories later.
If you need to delete a category you will have to choose a new category to migrate all posted transactions into.
- Note: You can add additional categories and edit the names of categories later.
- Once you’ve entered at least one category, click the green Save button at the bottom of the window.
-
Payment Plans
Once you've created an account, you have the option to add payment plans to it. If you click on an account from the list, such as Athletics in the example below, you will open the details panel for the account.

Here in the details panel, you can edit the account as well as add a Payment Plan.
See the following article: Payment Plans

Add or edit your account’s Categories after initial set up:
- Select the Account where you would like to add a Category.
- Click the +Category button at the top right of the Transaction Categories section.
- Input the Name of the Category
- Click the Save button at the bottom of the window.
Tips & Tricks for Setting Up Accounts and Categories
- Commonly used Accounts examples
- Tuition
- Incidental
- Miscellaneous
- Athletics/ Extra Curricular/ Clubs/ Sports
- General
- Should I use one or more than one accounts?
- The biggest determining factor here is how you will handle payments. If you will allow payment plans for some charges but not for others, you’ll need two accounts. For example: you may wish to allow payment plans for tuition, but not for hot lunch orders or sports registrations.
- We recommend two accounts minimum for most schools:
- Tuition
- Incidentals
- If you want to use both ClassReach Financials and accounting software (eg, Quickbooks), we recommend NOT duplicating each charge and payment in both. To save significant time and effort, use ClassReach as a sub-ledger and Quickbooks as a general ledger.
- A sub-ledger, or subsidiary ledger, provides the detailed information about specific school family accounts. The general ledger would only track the total accounts receivable and payouts for those family accounts and also school expenses, salary, etc.
- Example Account with Categories:
- Account: Athletics
- Categories:
- Equipment (for things like uniform costs)
- Registration (set to be used for registration costs)
- Travel (for things like hotel cost for away games).