Creating a Custom Report - Walkthrough
This article will walk through building a basic Users report and explain how to manipulate the options to get the information you would like to see.
The Custom Report Feature (all the reports found in the left column when creating a new report) uses the advanced custom reporting engine for ClassReach. This means that when you are building the report, you determine the data that the report is going to use.
To help you learn how to work with the Advanced Reporting Engine, this article will walk through the steps to build a basic Users report using an example report of all students and teachers in your school and their birthday.

Instructions for Walkthrough:
- Navigate to the Reports page and click the green + Report button to start a new report.
- This screen allows you to choose the report you would like to create.
- Select Users report.
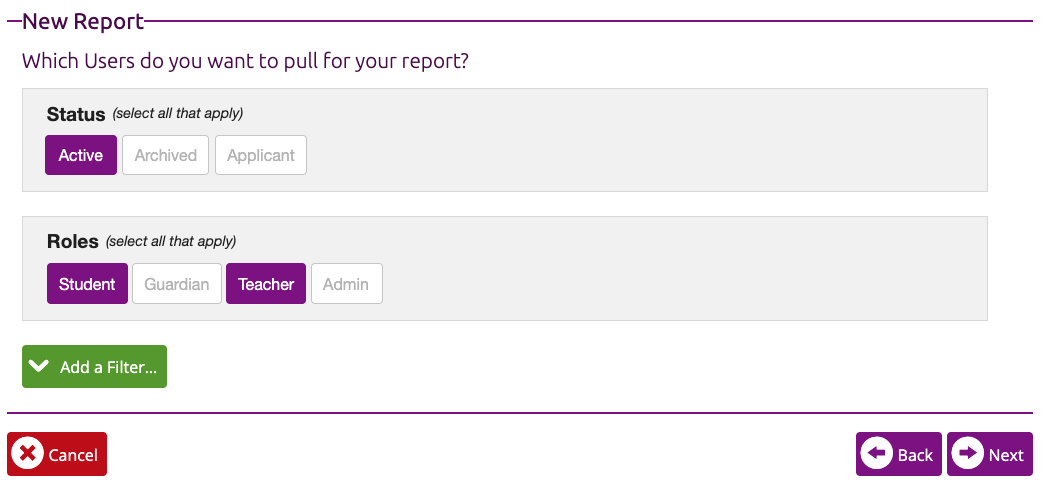
Which Users Do You Want to Pull For Your Report?
The default filters are a bit different between each of the report types. When creating a custom user report, both Active Status and Roles are already provided as default filters. Clicking on the Add a Filter… button shows another default filter, the By Academic Level. The last option is to Create Advanced Filter, which is an available filter type for all custom reports. These filter rules dictate what information will appear in the report that is generated. Only results that match each and every filter rule will make it to the actual report. If you run a report and unexpectedly have no data appear, the first place to check is the filter rules that are in place.
The Advanced Filter can do a multitude of tasks to help you get what you need. You can create a rule regarding almost any information field that is found in the ClassReach system. For example, you can filter to find all users with birthdays in November, the last name that starts with A, primary phone numbers that contain a 903 area code and much, much more.

- Mark the option for Active in the Active Status field
- Mark Student and Teacher for the options in the Roles field.
- Click the Next button to proceed to our next screen.
Choose Which Columns to Show on Your Report
This is where you build the columns of your desired report and decide what information will be displayed on the generated output. If you want a list of Guardians and their contact information, you would select the First and Last Name, and the Email and Phone Number fields as your columns.
Important Note: The maximum number of columns you can have in a PDF or Printable Web Page report is 8. If you would like more columns to display then that you will have to set the report to be a CSV. The CSV file can then be imported into a spreadsheet application such as Excel or Google Sheets to be viewed and manipulated.
You have the ability to rearrange columns after adding them to the report by dragging and dropping the property fields around. Do this by clicking and holding the three bar icon on the left-hand side of each field. You can also remove the report’s columns by clicking the trash icon on the right-hand side of each item.
The Show only one result per page? is useful when you need to print off individual sheets or separate the report into pieces. Instead of creating a table or spreadsheet, an entire page will be used for one result. This is very useful when you want something like a medical form that can be filed away for each student.

- Using the Select a property to display drop-down box, select the following three fields: First Name, Last Name and Birthday.
- Leave Show only one result per page? set to No
- Click the Next button to proceed to the next screen.
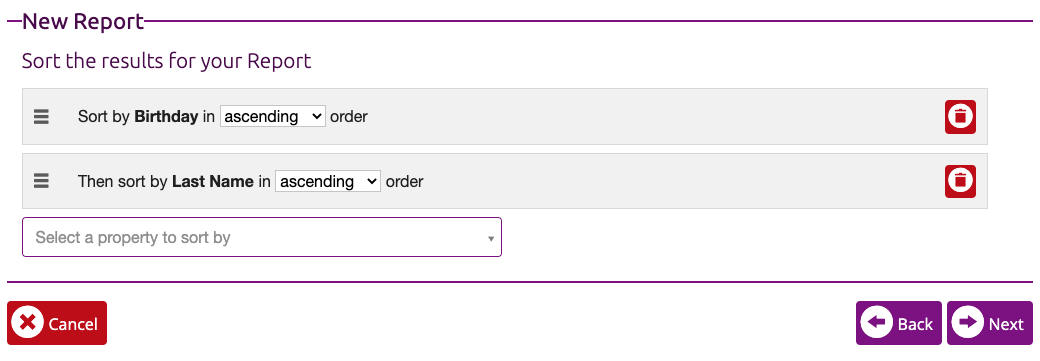
Sort the Results for Your Report
This screen will allow you to choose how your table is sorted (the order that the report displays the data). The Select a property to sort by drop-down is used to choose the target field to sort by and then once selected, you can choose Ascending or Descending order from the drop-down that appears. You can also select multiple sort properties following the same process.
It is possible to choose one or more fields to sort by that will break the report. If your report will not run (it gives you an error instead of results), try to remove the sort(s) and run the report again. If your report then runs error free, the problem was with your sort.

Click on the Select a property to sort by and choose the user’s Birthday property. After selecting birthday, you can then choose to sort results in Ascending order.
- In the 2nd Select a property to sort by choose the Last Name property and then just leave it in Ascending order as well.
- Then click the Next button to continue on to the next section.
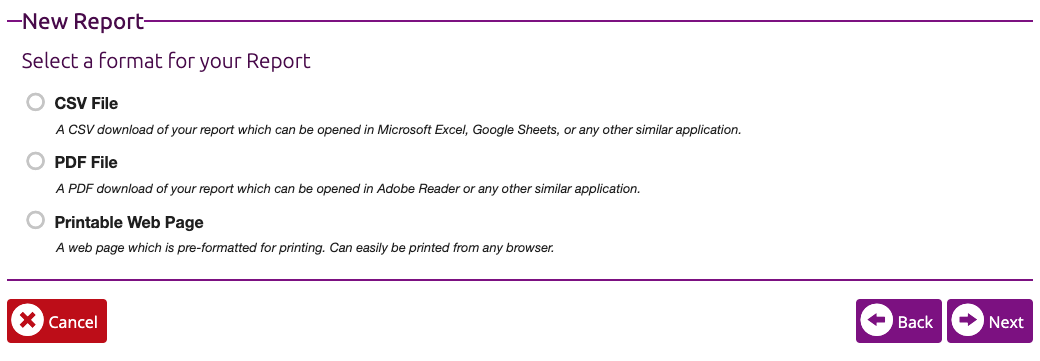
Select a Format for your Report
This next screen allows you to choose the display format for your report. You have the option to select from a CSV (an unformatted data table that you can manipulate in spreadsheet software). a PDF or a Printable Web Page (CSV is not an option for every report). This decision is based on what you want to do with the report output. If you want to work with the data (such as add up total payments for a school lunch) then you would use a CSV. If you want to download the report to send out to teachers or save it to a drive then use a PDF. Lastly, if you just want to look at the results to get some information, choose Printable Web Page.

- Mark the radio select option next to Printable Web Page and click the Next button to proceed to the last screen.
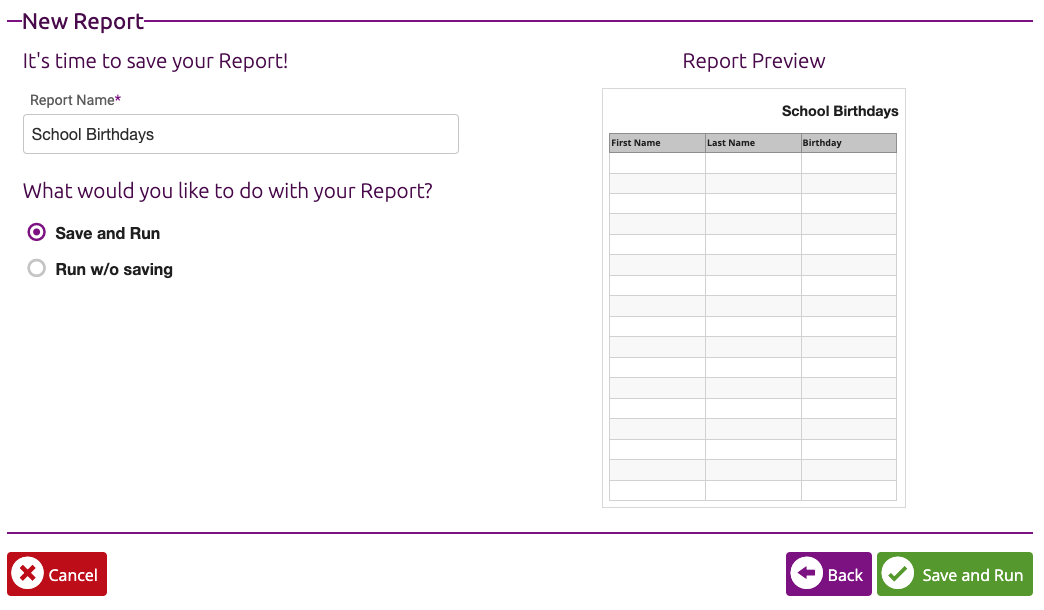
It's Time to Save Your Report!
On this final screen of the report building process. You can see a preview of your report and enter a name for it. We always recommend being overly descriptive in your report titles. We find it is common practice to have a dozen very similar reports with the only difference between them being academic level. At this time you can also choose to either Save and Run or Run without Saving this report.

Now is the time to name your report (We named this example "School Birthdays").
- Enter the name in the "Report Name" field (this is required)
- Select the Save and Run option so that you can use this report again
- Click the Save and Run button at the bottom right to generate your custom Users report
Important Note: The option to output the report as a Printable Web Page will open the report in a new tab. By default, most browsers will prevent website pop-ups or ads from opening using an ad-blocker. You can disable the ad-block for ClassReach (often in your browsers web address bar) in your browser settings.
Voila! You now have a custom report for your users that lists all active students and teachers in your school and is sorted in chronological order according to when their birthday occurs.