Add Payments to Forms
This article will show you how to add payments to forms
As an admin you may be able to add payments to forms. This allows you to invoice your users based on options they choose within a form.
- This is a permissions based task. If you do not see some of the options mentioned within this document, you may need to reach out to your lead admin to ensure you have the needed permissions enabled.
This is only available if your school has synced their account with one of our online payment processing platforms (Stripe or Gravity).
You have several Payment Field Options that you can use to take a Payment on a Custom Form. This video shows those options from a user view as well as how to set them up as an admin. You will also see how a user makes the payment via the form.
Enable Payments for Your Form
First, you will need to create your form. Second, you will need to go into the form's settings and enable payments.
- Click the form’s Settings tab.
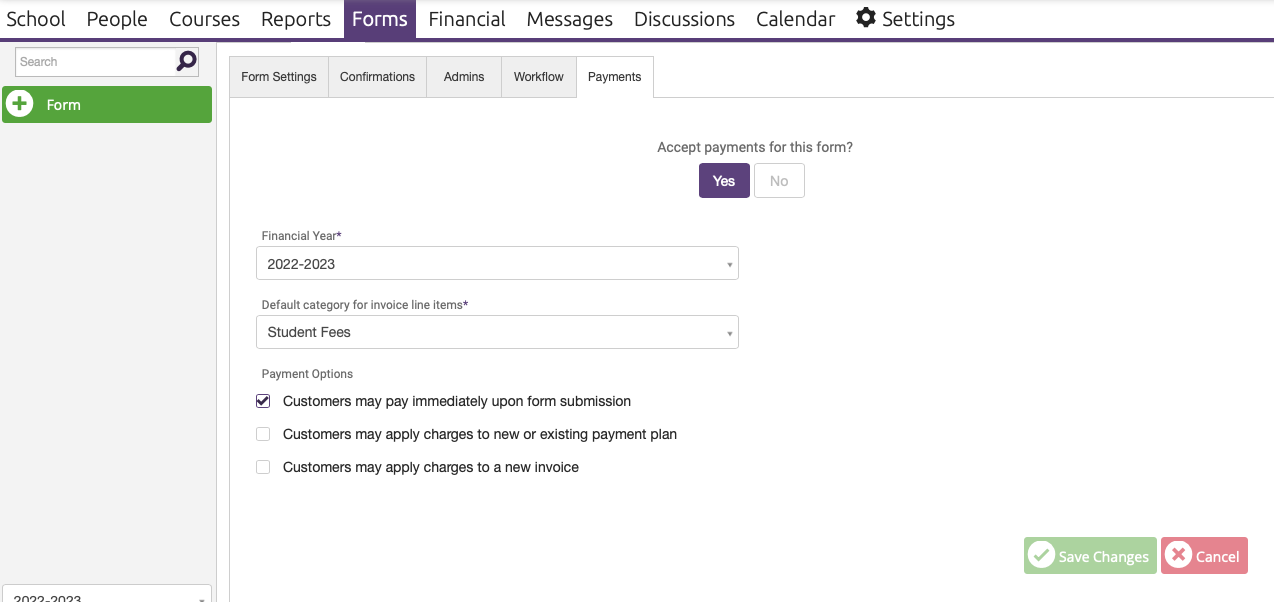
- Select the Payments tab.
- Switch “Accept payment for this form?” to Yes.
- Set the Financial Year.
- Set the Default category for invoice line items.
The option to "Pay Immediately" on a form requires the user to have a Payment Method entered in ClassReach Financials.
If users have a Payment Method in Financials prior to filling out the form they can use either Credit/Debit or Bank Account (ACH).
If users DO NOT have a Payment Method in Financials, they can enter a Payment Method at the time they are filling out the form.
- Gravity - users can enter a Credit/Debit Card or Bank Account
- Stripe - users can enter a Credit/Debit Card. Bank Card is not an available option.
- Select the Payment Options:
- Customers may pay immediately upon form submission – Allows customers to pay when they submit the form. If this is the only option chosen, the customer will be required to pay before the form will submit.
-
- Customers may apply charges to new or existing payment plan – Allows customers to add the charge to a payment plan. For example, if the school has an Incidentals payment plan due once a month, the customer may add this charge and pay at the same time as the other charges. If the invoice is applied to a payment plan where autopay is active, this charge will happen automatically on the next autopay date.
- Customers may apply charges to a new invoice – Allows the customer to create an invoice to pay later. You will need to set a type of due date:
- Fixed Due Date: A specific date this charge must be paid by, regardless of when they are submitting the form. An example of a good use, if you are collecting orders for T-shirts, yearbooks, etc. that must be ordered by a certain date. If the invoice is applied to the same account plan where autopay is active, this charge will happen automatically on the fixed due date.
- Variable Due Date: This would be a set amount of days after submission that they have to pay. An example of a good use: If you have an ongoing spirit shop they can order from any time, you may set that they just need to pay within 10 days of submitting it. If the invoice is applied to the same account plan where autopay is active, this charge will happen automatically on the variable due date.
Payments in Fields

Once you've enabled payments, you can add payment fields within your form. You'll use the Edit Form button to build the form. Most of the fields work exactly like Editing a Form, however, some are new and some can be enabled for payments. Fixed Amount and Custom Amount fields are the fields that have payments enabled automatically. For the others, you will select this option within the field editor.
- Fixed Amount – is an amount that will be charged to the customer upon submission. This is useful for things like registration forms that are filled out per student. Or you can use them in conjunction with Conditional Logic to appear when certain options are chosen.
- Custom Amount – allows the submitter to set an amount they would like to pay. This is good for collecting donations.
- Number - allows the user to set a quantity and the system will multiply it by the amount set. Useful for things like spirit shop orders, where a user may be ordering multiples of one thing.
- Check boxes and Radio Buttons – Allows you to set different costs for each of the choices available. This is good for things like lunch orders.
Once you have your form the way you’d like, you can save and publish it!
