Reports are used to gather, organize and analyze information about your school from the data in ClassReach. For example, you can pull a student’s transcript, create a report that lists all the responses to a form you sent, or print class schedules with a couple clicks of a button. In this article, we will orient you to the Reports page and the types of reports you can run.
As of Dec 2025, the are two types of ClassReach Reports - the original built-in reports (Type 1) and, a new report engine that gives a parameterized style of creating reports (Type 2).
Report Type 1 - (Original Built-In Reports)
- Create a New Report - click the green +Report button.
- Run a Saved Report - use the Search bar or the left sidebar filters
Create a New Report
- Financial Reports are only available to admins with Financial Permissions.
- Users - these reports allow the admin to report on User data from the People page.
- Families - to report on Family or User data that includes People page information as well as Applications.
- Form Responses: Gather information from Forms. For example, if you’ve created a form and want to see the responses formatted in a table, this is the report to use.
- Calendar Events: Gather information from the Calendar. For example, an agenda style view for the next month.
- Class Rank: View rankings of students by grade averages within an Academic Level
- Section Enrollment: View enrollment statistics for all sections at once.
- Sections: Gather information about the Sections in your system. For example, distribute a list of courses & sections that are going to be offered in the upcoming school year.
- Attendance: View a list of students who have been absent/tardy/etc...
- Attendance Markings: Gather information about specific attendance markings. For example, you could use this to show a detailed attendance record for a student(s).
- Cumulative Grade Reports: View cumulative grades for a specified range of Academic Terms. **This report is only intended for schools using multiple Academic Terms in one school year and does not present correctly if you divide the year into Grading Units**
- Grade Averages: Gather information about student grade averages. For example, you can get a quick idea of how students are doing in their classes.
- Grades Below (___): View all student averages below a specified value.
- Progress Reports: View student progress reports for an Academic Term.
- Student Schedules: Provides student schedules for an Academic Term.
- Transcripts: View a full record of high school classes taken and credit earned for a student(s).
- Unit Transcripts: This report expands on the Transcript report by allowing you to select several more options including dividing up the school year to see the grades for each Grading Unit (which should correspond to each reporting period).
We have a few articles to help with creating Type 1 reports.
-
- Create Your First Report - A Simple One
- Creating a Custom Report - Walkthrough
- Filtering Reports Like a Pro has detailed help on the ins/outs of filtering

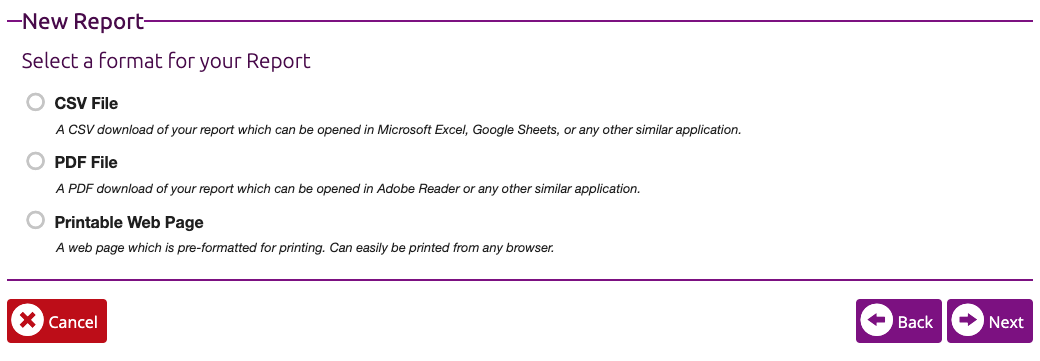
Selecting a Display Format for your New Report
The second to last screen when creating a new report allows you to choose the display format for your report. You have the option to select from a CSV (an unformatted data table that you can manipulate in a spreadsheet ) a PDF or a Printable Web Page (CSV is not an option for every report). This decision is based on what you want to do with the report output. If you want to work with the data (such as add up total payments for a school lunch) then you would use a CSV. If you want to download the report, send a copy out to teachers, or save it to a drive then use a PDF. Lastly, if you just want to look at the results to get some information, choose Printable Web Page.
Run a Saved Type 1 Report
Type 1 Reports that you previously saved are accessible anytime from your Reports page. Reports are not shareable between users. Other Admins do not have access to your reports and you do not have access to their reports.
There is a Search box at the top left of the Reports page. This searches the titles of your reports to help you locate a previously saved report.
The rest of the left side panel below the search box can be used to Filter your Type 1 reports. Selecting one of the options here will show you all reports of the selected Report Type.
Edit a Previously Created Report
Once you have found the report you are looking for, you may click the Edit button to open the report editor. You can change all the information and options that were previously set. Simply click Next through the windows until you get to the option you would like to edit.
When you have finished editing your report, you may take three different actions.
- Overwrite Existing Report – This will remove the previous version of your report and replace it with the currently edited version. This is a good option when you’re making a permanent change to a report.
- Make a Copy – This will save your report as a new report. This will have no impact on the report that was initially opened to edit. This is great to use when you need a lot of similar reports, like one for each Academic Level.
- Run Without Saving Changes – This will not save your report or any of the alterations made to it. This is good when you want to test out a slight alteration to a report, but need the original report more than the test report.
Run a Previously Created Report
Clicking the Run button next to a report will produce a new report with up to the minute data. If you want to check attendance every afternoon, you only have to make a report for attendance one time. Then simply run that report each afternoon to get fresh data. There is no need to rebuild a report each time you need it.
Delete a Previously Created Report
Clicking the small red Trash Can button next to a report will remove it from your reports.
Report Type 2
Type 2 Reports are available based on ClassReach billing Tier. There will be reports available to all schools and some reports will be restricted to specified Tiers.
Type 2 reports are available via the ClassReach Reports page and the +Report button.

Type 2 Reports are run through a pop-up window and cannot be saved on the ClassReach Reports page like Type 1 reports.
Steps to Produce a Report
- Click the green +Report button (see above) on the left sidebar
- Select the report
- Select the parameters for your report
- Click View Report to run it
- Preview the report and Print or Export the results.
Reports Menu
Upon clicking the + Report button, the pop-up window is a Reports Menu that lists all the reports by category.

The mechanics of creating and saving the reports (which includes exporting to PDF, CSV, etc) is different than the Type 1 reports. Selecting a report will open a pop-up window and will either run the report or load the interface and wait for you to enter the required parameters first.
The Report Interface
You will see the following pop-up window when you click to run a Paginated Report.

Ribbon and Action Bar
- File - displays the below options in the Action bar
- Print - launches your print dialog for quick printing of the report
- The “Disable preview features” option in the Home menu controls whether experimental or early-access features are available in your report experience. This is not currently used in ClassReach.
- Home - displays the below options in the Action bar
- Export - gives you several options to download your report including PDF and CSV.

-
- Pagination Controls
-
- First Page (⏮) – Jump to the first page.
- Previous Page (◀) – Go back one page.
- Page Number – Displays current page; you can type a number to jump.
- Next Page (▶) – Go forward one page.
- Last Page (⏭) – Jump to the last page.
-
- Parameters - Opens or hides the parameter input section, allowing you to filter or customize the report dynamically.
- Pagination Controls
For the best viewing experience of the Report results, we recommend hiding the Parameter section.
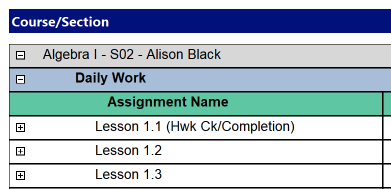
- View - allows you to choose between web layout or print layout. In some of the reports, using the web layout allows admins to expand results by clicking on a +/- on the left side of a row.
Parameters - The Parameters section of the Report Interface allows you to select options to filter your report and click the View Report button to run the report.
Report Canvas - the results of running the report will be displayed here and allows for viewing of the report and paging through results. The intent of the canvas is to preview the report and then export or print it.